One-point perspective is a fundamental technique in art that helps create depth, making flat drawings look three-dimensional. By learning this method, you can add realism to your art, especially when drawing objects like roads, hallways, or buildings. Let’s dive into the basics of one-point perspective and how you can use it to improve your drawings.
What is One-Point Perspective?
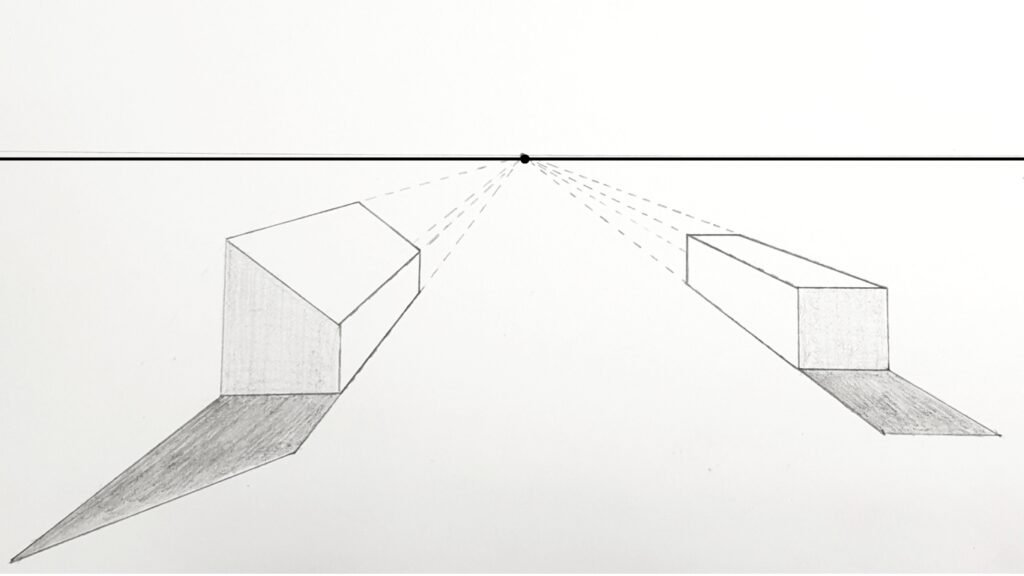
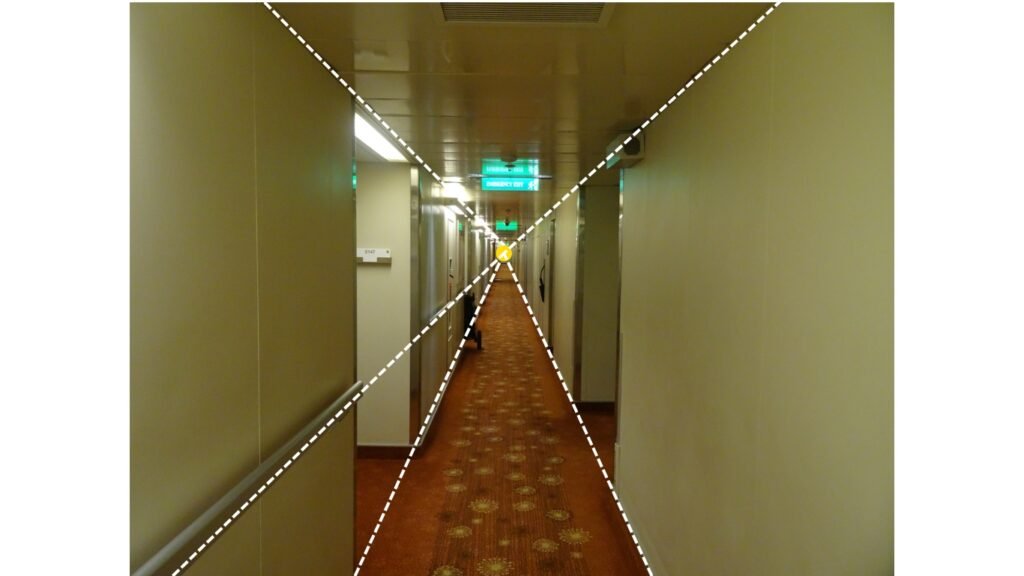
One-point perspective is a drawing technique where all lines converge at a single point on the horizon line, called the vanishing point. This method is perfect for subjects directly facing the viewer. Here are the essential elements:
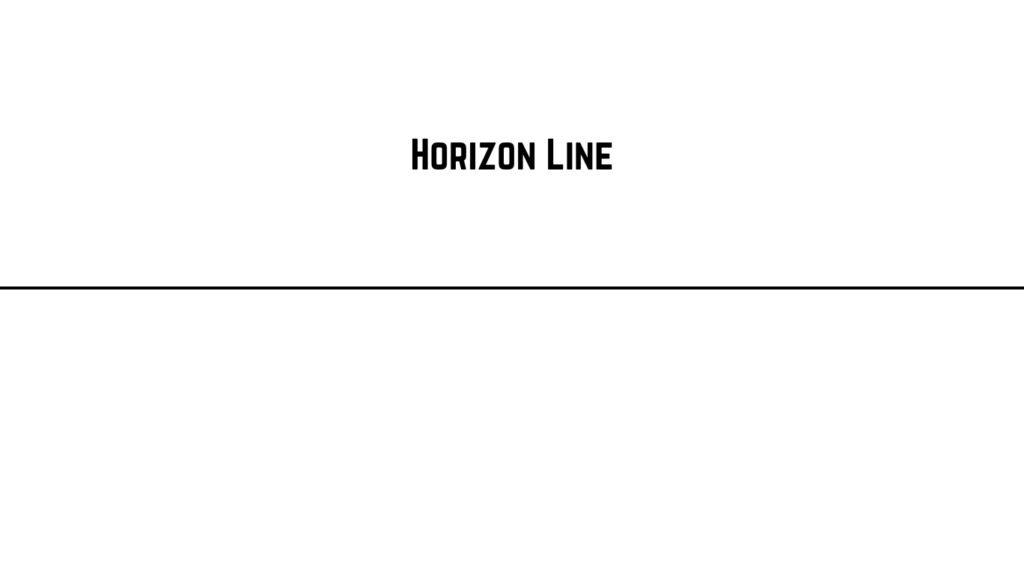
- Horizon Line: The viewer’s eye level, where the sky meets the ground.
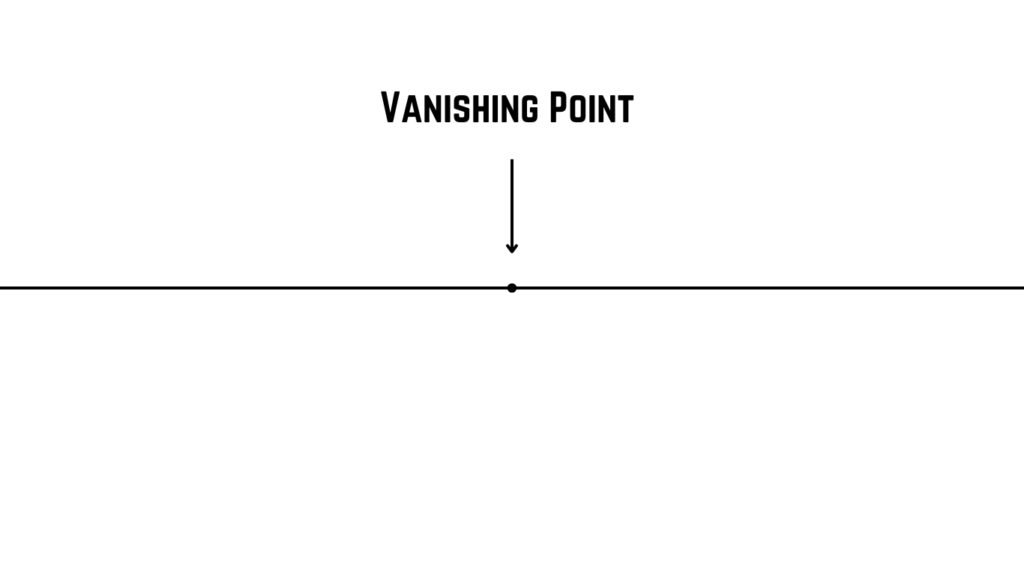
- Vanishing Point: The point on the horizon line where all lines converge.
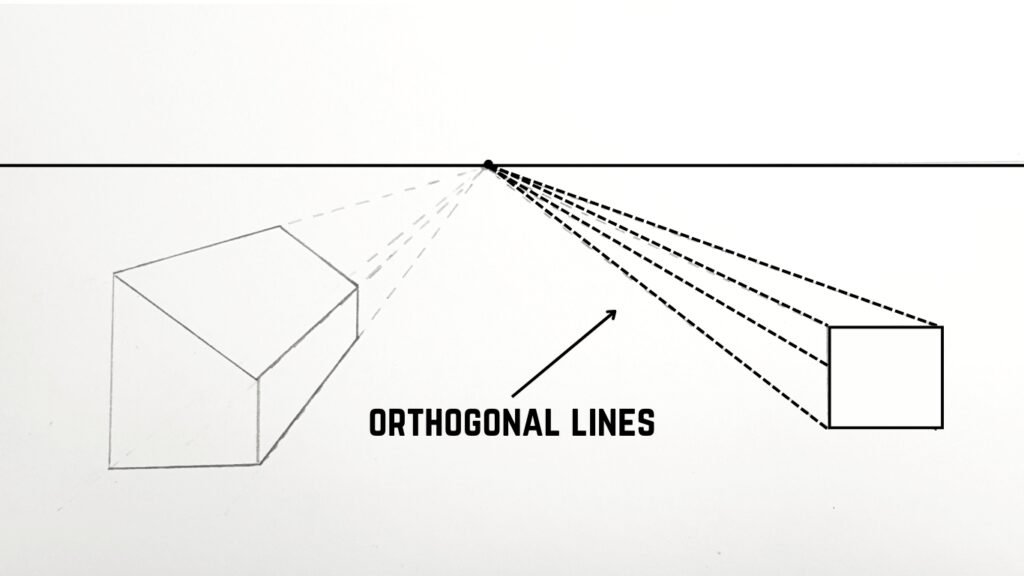
- Orthogonal Lines: Diagonal lines that lead to the vanishing point, creating depth.
- Transversal Lines: Lines that run perpendicular to the orthogonal lines, indicating width and height.
Steps to Create a One-Point Perspective Drawing
Here’s how to draw using one-point perspective:
Enhance your drawing with details, textures, and shadows for a more realistic look. Adding these elements brings your drawing to life.
Draw the Horizon Line
Start with a horizontal line across your paper to represent the horizon. This line should be positioned at eye level, which helps in setting up the perspective.
Place the Vanishing Point
Choose a point on the horizon line. This will be your vanishing point, the focal point where all parallel lines appear to converge.
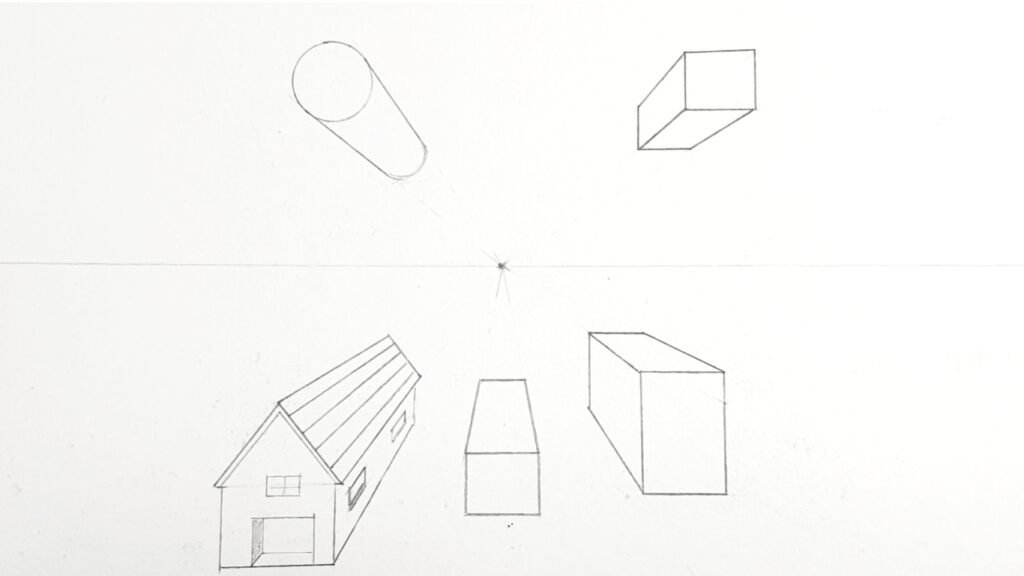
Sketch the Front Face
Draw a shape, such as a rectangle or square, to represent the front of the object facing you. This is your starting plane.
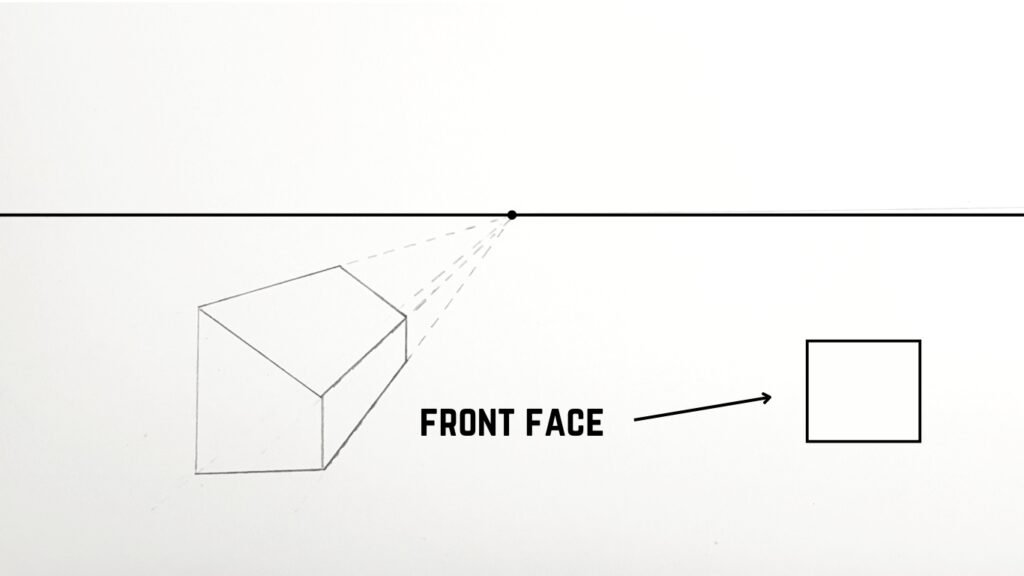
Every Horizontal lines will be 180 degree and Vertical lines 90 degree.
Add Orthogonal Lines
From each corner of the front face, draw lines towards the vanishing point. These lines show the object’s depth and give the illusion of space receding into the distance.
Draw lines lightly so that you can erase the unwanted lines later.
Draw Transversal Lines
Add lines perpendicular to the orthogonal lines to define the back edges of the object. These lines help in maintaining the correct proportions and shape.

Every Horizontal lines will be 180 degree and Vertical lines 90 degree.
Refine and Detail
Enhance your drawing with details, textures, and shadows for a more realistic look. Adding these elements brings your drawing to life.
Application of One-Point Perspective
One-point perspective is used in various fields to create realistic visualizations:
- Architecture: For designing buildings and structures. Architects use one-point perspective to present how a building will appear from a specific viewpoint.
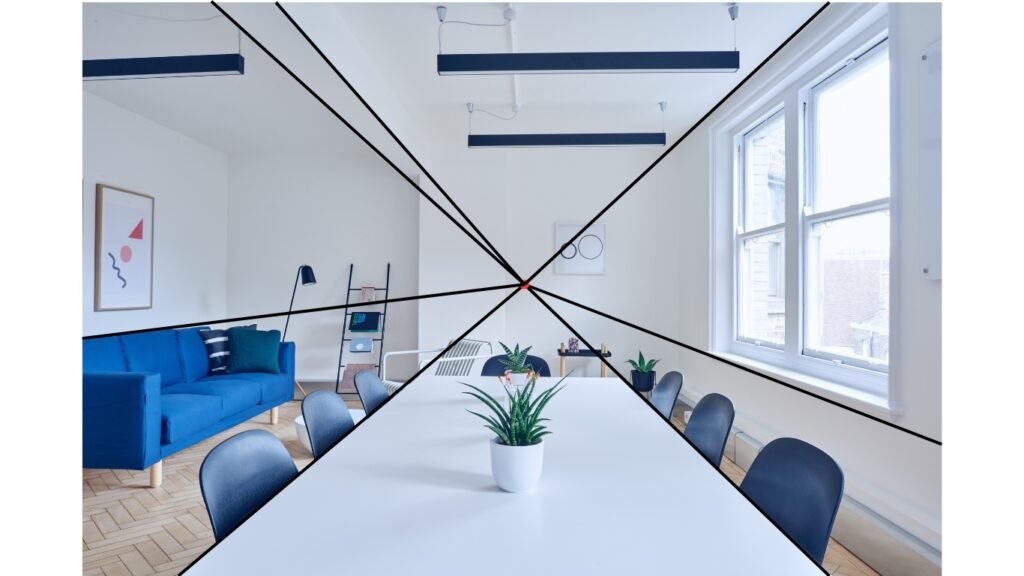
- Interior Design: To plan room layouts and furniture placement. This technique helps visualize the space and how different elements fit within it.
- Video Games: To create immersive environments and backgrounds. Game designers use one-point perspective to add depth and realism to virtual spaces.
Tips to Master One-Point Perspective
- Start with Simple Shapes
- Begin with basic shapes like cubes to understand the fundamentals. Once you master these, you can move on to more complex forms.
- Use a Ruler
- Ensure your lines are straight and accurate. This tool helps maintain precision, especially for beginners.
- Experiment with Vanishing Points
- Place the vanishing point in different spots to see how it affects the perspective. This can change the sense of depth and space in your drawings.
- Incorporate Shadows and Textures
- Add these elements to give your drawings a more lifelike appearance. Shadows can enhance the illusion of depth, while textures add detail.
- Observe Real-Life Scenes
- Look at real environments and try to identify the horizon line and vanishing points. This practice will help you understand how perspective works in the real world.
Common Mistakes to Avoid in One-Point Perspective
- Incorrect Vanishing Point Placement
- The vanishing point should always be on the horizon line. Placing it incorrectly can distort the perspective.
- Ignoring the Horizon Line
- The horizon line is essential for consistent perspective. It represents the viewer’s eye level and helps align objects correctly.
- Inconsistent Orthogonal Lines
- All lines should converge at the vanishing point. Inconsistent lines can break the illusion of depth.
- Poor Proportions
- Maintain realistic proportions using grid lines if necessary. This ensures that all elements of your drawing are in scale.
- Adding Too Much Detail Too Soon
- Focus on the basic structure before refining the details. Starting with the overall layout helps avoid mistakes in the foundational stages.
Why One-Point Perspective Matters?
One-point perspective helps artists create depth and realism in their work. Whether you’re drawing a simple room or a complex cityscape, this technique makes your drawings more dynamic and engaging. It provides a structured approach to depicting space and distance, which is crucial for creating believable scenes.
Practice Exercises for One-Point Perspective
Draw a Room
Sketch a simple room using one-point perspective. Start with the back wall as the front face, then add furniture using orthogonal and transversal lines. This exercise helps in understanding how to fill space within a perspective framework.

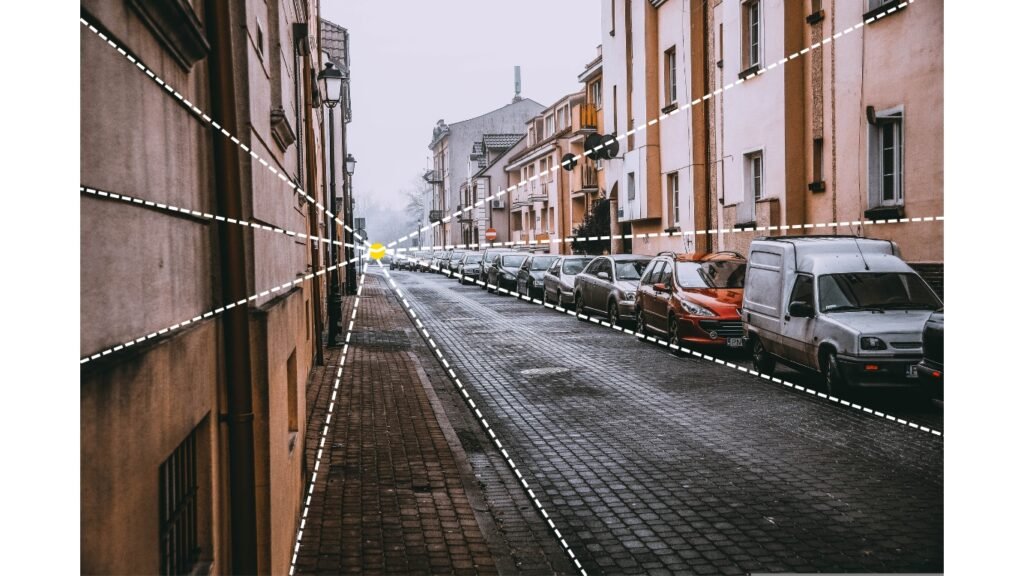
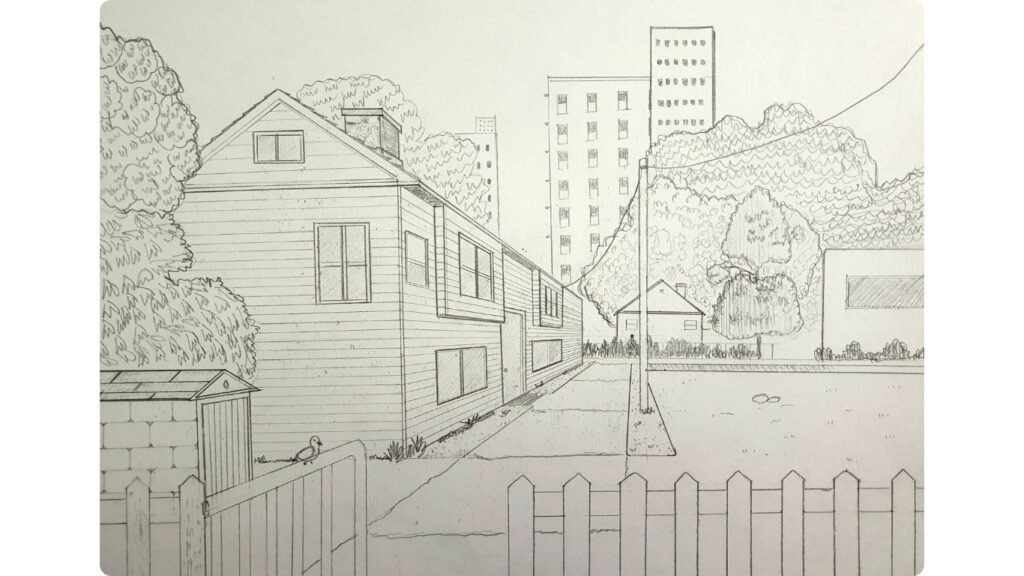
Create a Street Scene
Draw a street with buildings on both sides. Use the vanishing point to align the buildings and add depth. This practice is excellent for learning how to handle multiple objects within the same perspective.

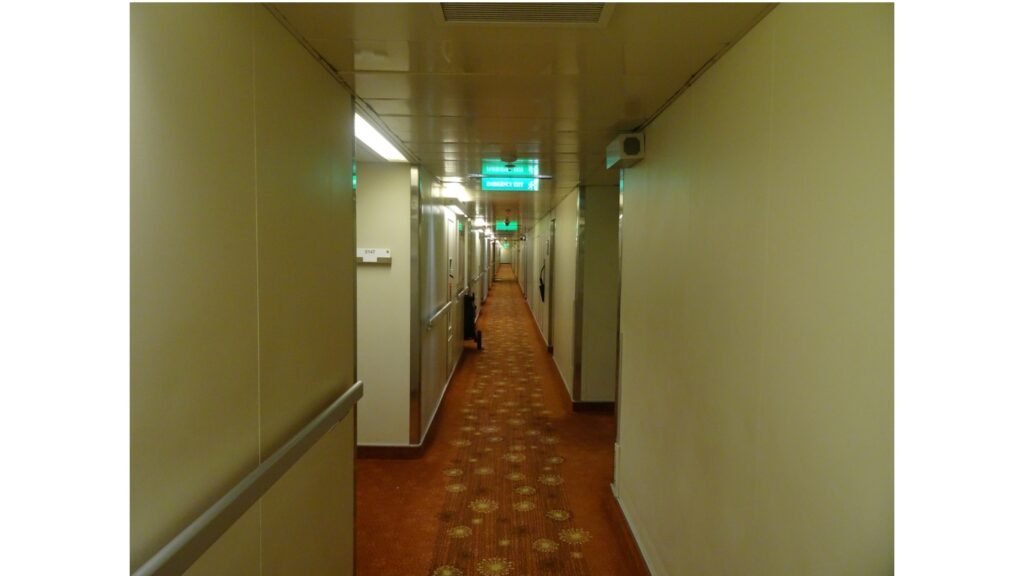
Draw a Hallway
Practice drawing a long hallway, focusing on the convergence of lines towards the vanishing point. Hallways are perfect examples of one-point perspective in real life.
Refining your Technique in One-Point Perspective
- Shading and Lighting: Experiment with different lighting conditions to see how shadows fall in one-point perspective. Light sources can dramatically affect the perception of depth and volume.
- Textures: Add textures to surfaces like bricks, wood, or tiles to enhance the realism. Textures provide additional information about the surface quality and materials.
- Multiple Objects: Practice drawing multiple objects in one scene, maintaining consistent perspective. This will help you understand how different elements interact within the same space.
Conclusion
Mastering one-point perspective is a valuable skill for any artist. It allows you to create realistic, three-dimensional drawings that capture the viewer’s attention. With regular practice and observation, you can use this technique to bring your art to life. Keep experimenting, and soon you’ll see significant improvements in your work. Whether you’re sketching simple objects or intricate scenes, understanding one-point perspective will enhance your artistic capabilities and open new possibilities in your creative endeavours.
Blending tools are commonly used by artists to get smooth transitions, soften harsh lines, and create realistic textures in graphite or charcoal drawings. They range from blending stumps and tortillons for detailed shading, to items like paper towels, chamois, Q-tip, even your hand. Each tool offers unique effect, helping artists refine and control their artwork.
In this Guide you will learn
List of Blending Tools
Here are some popular options.
- Paper Stumps: Cylindrical tools made of tightly rolled paper with double point, useful for smoothing larger areas.
- Tortillons: Similar to paper stump, but smaller and with a single point, good for detailed blending.
- Blending Brush: Brush designed to move graphite or charcoal gently across paper.
- Paper Towel: Inexpensive and accessible, they are great for blending broad regions and softening tones.
- Your Hand & Fingers: The simplest too, especially for large areas.
- Q-tip: Handy and easily accessible, perfect for smaller areas and controlled blending.
- Chamois: A soft leathery cloth material ideal for large, smooth blends, especially for charcoal or pastel drawings
How to Use Blending Tools?
To use Blending tools, apply them gently over shaded areas to smooth transitions and blend values.
Your Hand & Fingers:
- Your hand is the most accessible blending tool! Many beginners naturally reach for their fingers to smudge and blend graphite.
How to use:
- By using palm or the side of your hand, you can blend large areas smoothly with circular motions. With fingertips you can blend smaller areas as small as your fingertips.
Tips:
- Avoid pressing too hard.
- Always keep your hands clean to prevent smudging.
Disadvantage:
- Oils from the fingers can leave unwanted marks.
Paper Towel:
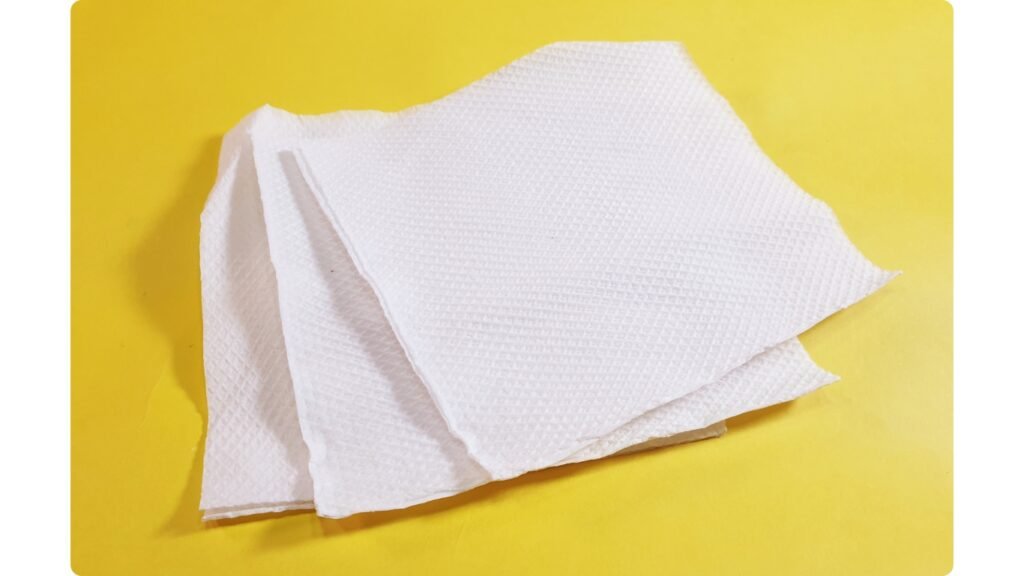
Paper towels are great for blending large areas and softening tones. They are inexpensive and easily accessible.
How to use:
- Wrap the tissue around your finger, and start blending in a circular motion like you do it with your fingertips from dark area into the light area.
- Another way to do is by laying down charcoal or graphite on a scrap paper and rub the towel on it before using it on your drawing paper for softer effect.
Tips:
- When the spot gets dirty, move your finger to another spot of the towel.
Paper Stump:
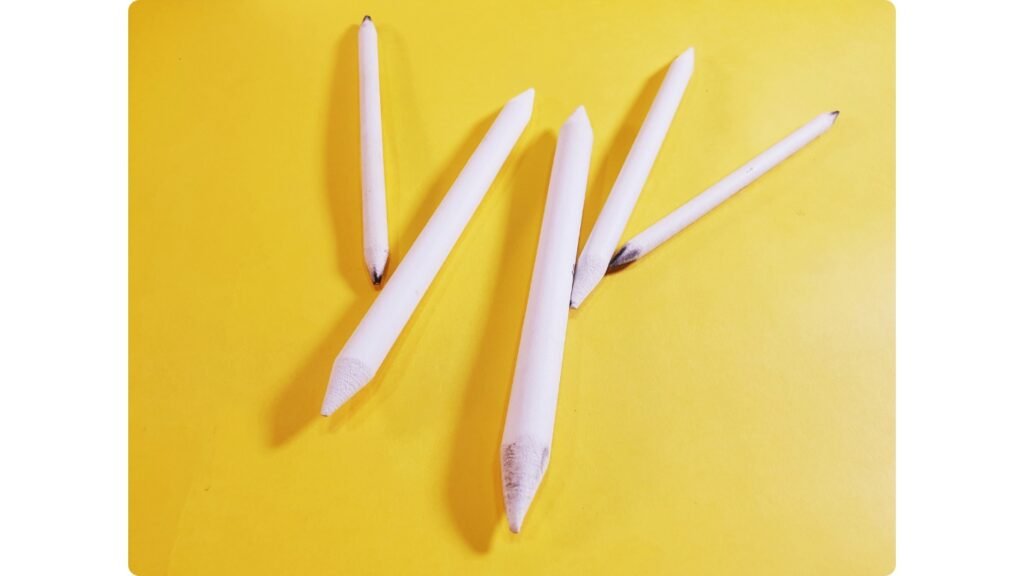
Paper stumps are useful for creating smooth transition in a small area or adding subtle shadows.
How to use:
- Hold the stump at an angle and blend from dark values into the lighter values.
Tips:
- When the stump gets dirty don’t throw them, you can either use sandpaper to sharpen the stump or use the dirty stump to blend darker values.
- Don’t use one stump for all your blending needs, have one for darker, medium and lighter values each, to avoid clean multiple times.
Tortillons
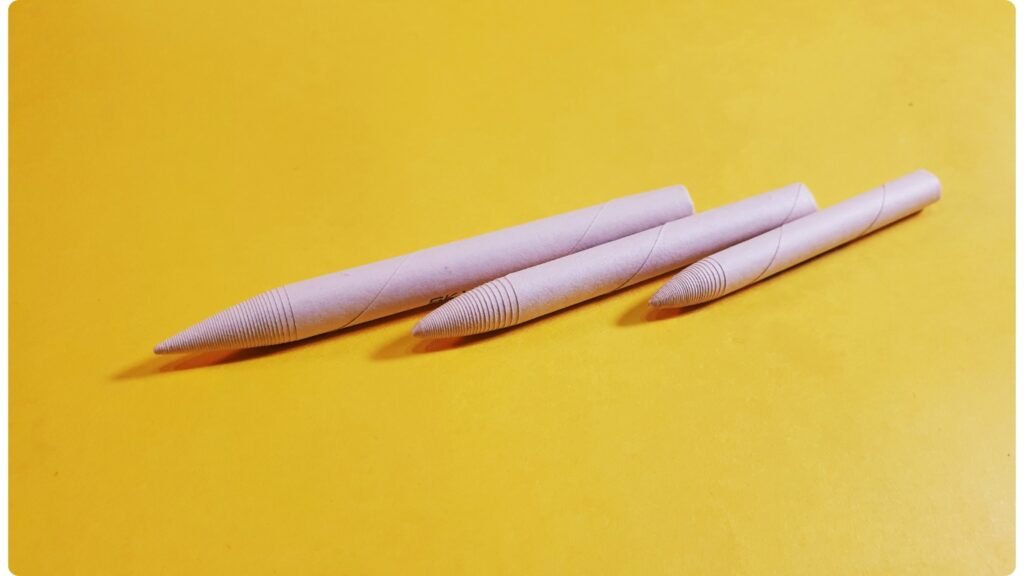
Similar to paper stump, tortillons are small, tightly-wounded paper tool with a pointed tip.
How to use:
- Hold the tortillon at an angle, rotate the tortillon while blending to pick up and distribute graphite more evenly.
Tips:
- Dirty Tortillons are great for shading darker areas, so don’t discard them after use.
Chamois
A chamois cloth is excellent for covering large areas with smooth, even tones.
How to use:
- You can wrap it around your finger or fold it in a way you can comfortably hold it for blending.
- You can experiment with any motion you like (e.g. circular motion)
Tips:
- Start slowly as chamois can remove layers of graphite or charcoal very effectively, or else you have to add values over and over again.
- Use a clean section of the chamois for each blend to avoid smudging other areas of your drawing.
- Wash it after it gets dirty.
Q-tip
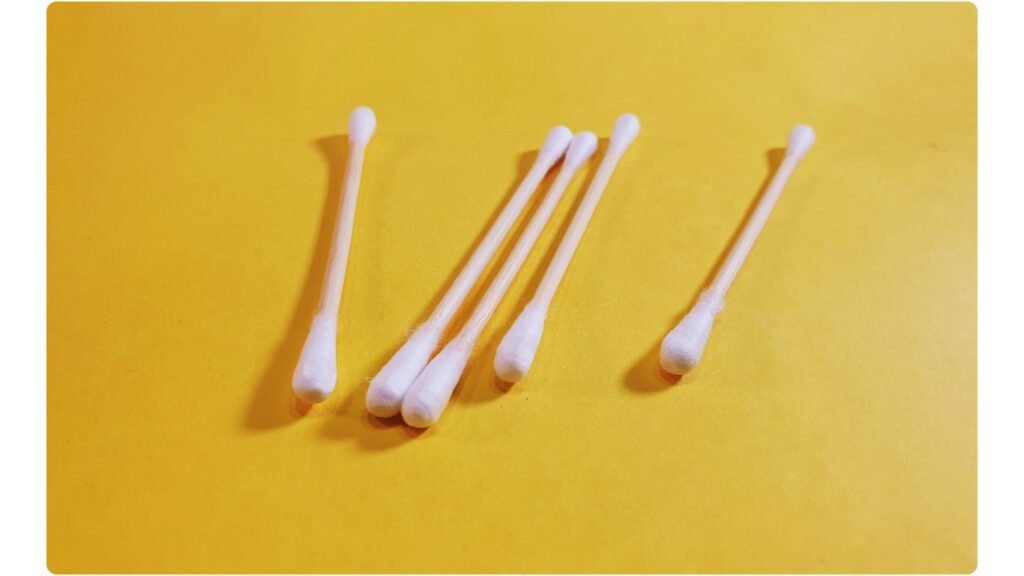
Q-tip are versatile and precise blending tools for small areas.
How to use:
- Use light pressure with a Q-tip, you can experiment with any motion you like.
- Use fresh Q-tip while working with lighter areas.
Tip:
- Pressing hard can push the material around, which could lead to a muddy look in your drawing.
Blending Brush
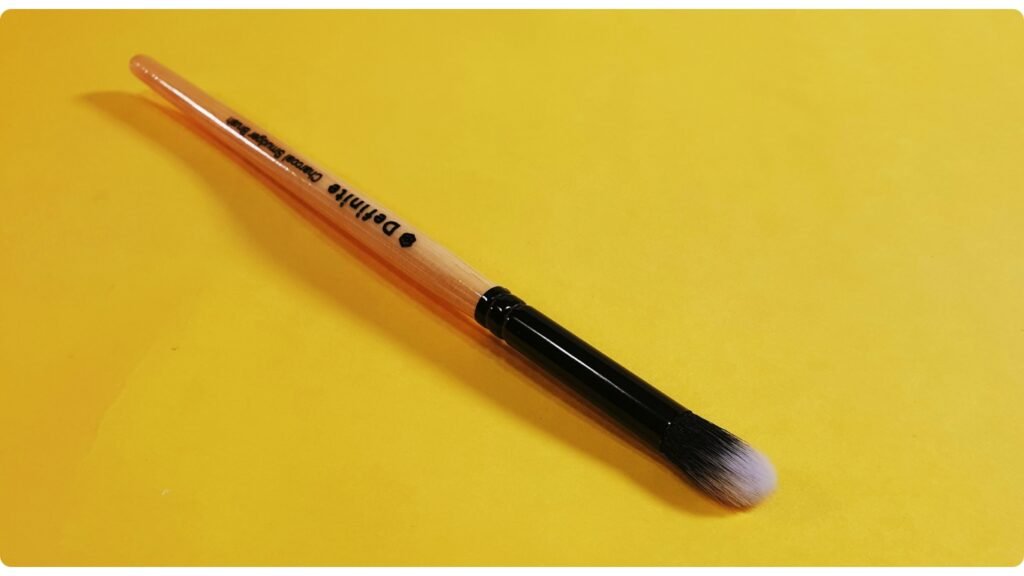
Brushes designed specifically for blending can create subtle textures, especially when working with powdered graphite or charcoal.
How to use:
- Dip dry brush in powdered graphite or charcoal then start blending on to the paper in circular motion (you can use any motion you like).
Tips:
- Best for light blending and not ideal for darker and more detailed areas.
When should you use Blending Tools?
Use blending tools when you want to smooth out shading and create seamless transition between light and dark.
The need for blending tools largely depends on two factors:
- The texture of the subject – Smooth subject like skin often requires blending for realistic shading.
- The texture of the paper – On smoother papers, you may create smooth realistic shading as it doesn’t have any visible textures.
Rough paper might naturally provide a texture you need, without a blending tool.
When to Skip Blending Tools?
Skip blending tools when drawing on textured paper (like charcoal paper), the paper itself can provide enough visual interest to skip blending. If you’re drawing a tree, bushes or subject requiring defined, sharp details like hair, fur or foliage, the rough surface helps achieve the texture you need without extra tool.
Every drawing does not need a blending tool. Blending tools are often overused, leading to messy, smudged artwork. The key is understanding when and where to use them, don’t reach out for a blending tool just because it’s a habit.
- Don’t use blending tools when you need a textured look in your drawing.
- You can avoid blending tools by controlling graphite pencil and mastering pressure and technique.
Key Takeaways for using Blending Tools?
- Texture Matters: The texture of your paper and the subject dictates whether you need to use blending tools.
- Blending Alternative: Controlling and adjusting pencil pressure are great alternatives to overusing blending tools.
- Variety of Tools: Try a range of blending tools to find what works best for you.
- Mind Your Hand: Avoid using fingers directly, as oil from fingertips can damage your artwork.
- Practice: Blend intentionally. Start with clean tools and practice on scrap paper before applying to your final drawing.
When I started my art journey even, I was shocked to know there were these many types of erasers.
Different types of erasers serve different types of purposes. Erasers are more than just correction tools in an artist’s toolkit-they’re essential for shaping, refining, and enhancing your drawing.
Here’s a breakdown of the most commonly used erasers by artists and when to use them in your drawings.
Rubber Erasers
Details: This is the classic erasers used in schools and offices. It works well with general-purpose erasing and is effective at removing stubborn graphite marks. It provides better precision while still being gentle on the paper.
- Texture: Firm
- Best for: Standard pencil marks
- Crumbs: Leaves some debris

Vinyl Erasers
Details: Vinyl erasers are the multitasker. They’re capable of erasing even dark heavy marks, and some can even remove ink. However, their rigid texture can easily damage delicate or thin paper if too much pressure is applied. Use Vinyl erasers for heavy duty job, like erasing thick graphite marks.
- Texture: Hard, rigid
- Best for: Heavy-duty erasing, ink removal
- Crumbs: Leaves larger, stickier crumbs that are easy to clean up
- Strength: Very strong erasing power

Kneaded Erasers
Details: A kneaded eraser is one of the most flexible erasers you can have. Its mouldable texture allows it to be shaped into fine point, perfect for erasing small details or creating highlights in your drawing. Unlike other erasers, it doesn’t leave any crumbs. You can “knead” it to refresh its surface as it absorbs graphite, making it a reusable tool. It’s excellent for lifting graphite gently without disturbing the paper texture.
- Texture: Soft, mouldable
- Best for: Fine details, Highlights
- Crumbs: Leave no residue or crumbs
- Strength: Ideal for precision

Gum Erasers
Details: Gum erasers are soft and easy on paper. They’re not great for fine detail work due to their softness but are excellent for erasing broad section of your drawing without harming the surface.
- Texture: Soft, gummy, crumbles easily
- Best for: Gentle removal on a variety of paper types
- Crumbs: Leaves behind plenty of debris
- Strength: Good for large area
(Don’t chew them they don’t taste like bubble gum, I tried!)
Pencil Erasers
Details: Pencil shape casing is used around a cylindrical eraser; this eraser can be either vinyl or rubber. It comes in many different thicknesses. They can be sharpened as a pencil, making them perfect for erasing tiny, precise areas. However, the firm tip can be rough on paper, so use it with care. It’s great for artists who need pinpoint accuracy but shouldn’t be used for large or delicate areas.
- Texture: Firm, can be sharpened like pencil
- Best for: Fine, Detailed erasing
- Crumbs: Minimal
- Strength: Extremely precise

Electric Erasers
(Ironman of erasers!)
Details: Electric erasers area step up from traditional manual erasers. With a motorized, rotating tip, they allow artists to erase with extreme precision and little pressure. They work exceptionally well with graphite, coloured pencils. However just like vinyl erasers, they can damage detailed paper if not used carefully. Electric erasers are often used by professional artists for creating highlights, refining edges, and erasing mistakes without fatiguing the hand.
- Texture: Replaceable rubber or vinyl eraser
- Best for: High Precision erasing with minimal effort
- Crumbs: Moderate, Depending on the erasing tip
- Strength: Excellent for detailed work, but can damage detailed paper

Key Tips for Using Erasers
Keep Your Erasers Clean: Regularly clean your erasers to maintain their effectiveness. Kneaded Erasers can be refreshed by folding them, while other erasers should be wiped or trimmed if they get dirty.
Final Thoughts – When to Use Each Erasers
- Gum Erasers: Ideal for gentle erasing over large area on sensitive paper.
- Rubber Erasers: Great for general use.
- Kneaded Erasers: Best for fine details, highlights and small area. Perfect for soft erasing.
- Vinyl Erasers: Best for removing heavy marks and creating clean edges but may harm delicate paper.
- Pencil Erasers: Excellent for precision work but can be harsh on paper-use for small corrections only.
- Electric Erasers: Perfect for high precision work with minimal effort, great for creating highlights and correcting fine details.